NetWorkDays
Author: Dominik Petrie
NOTE: in July 2022, a new NETWORKDAYS DAX function was released in Power BI, so this manually created custom function is no longer required. Read more about the DAX function on the Microsoft Power BI Blog.
The Scenario
Power Query offers some date functions, but none resemble Excel’s NETWORKDAYS to calculate the number of working days between two dates. In this pattern you’ll get a custom Power Query function which does exactly that.
Our Goal

In your table you have two columns: StartDate and EndDate. To calculate the number of working days (the number of days not counting Saturdays and Sundays) between these dates you add a custom column in which you use your new custom function. Just like you would do in Excel, pass both the StartDate and the EndDate as parameters into the function.
The Logic behind the Function
First, we create a list of dates from the start to the end date. Then we add a column that gives us the weekday for each day. Using a filter on that column, we remove all Saturdays and Sundays. The number of working days equals the number of the table’s remaining rows.
Step 1: Create the list of dates
We start with an arbitrary list of dates which we’ll replace later by using the functions parameters:
- Create a new query → From Other Sources → Blank Query
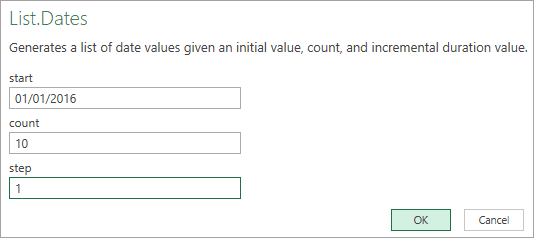
- In the formula bar enter the following formula: =List.Dates
- Click Invoke Function
- Enter the following values for start date, count and step and click OK

- To convert this list into a table, go to List Tools → Transform → To Table
- Leave the default options and click OK
Step 2: Add the DayOfWeek column
For each day in the list we determine the day of week (0=first day of the week, 1=second day etc.):
- Select the column → Add Column → From Date & Time → Date → Day → Day of Week
In this new column, Power Query uses the Date.DayOfWeek function on each date. The function returns a number between 0 and 6, where 0 is the first day of the week, 1 the second day, and so on. But which day is the week’s first day? That depends on your regional settings! In the US the week starts on Sundays whereas in Germany (where I live), Monday is the week’s first day. To be independent from the Windows regional settings, we add an (optional) parameter to the Date.DayOfWeek function to tell the function what the week’s first day is (here: Monday):
![]()
Step 3: Filter out all weekend days
Next we remove all Saturdays and Sundays by applying a filter:
- Select the DayOfWeek column’s filter arrow → Uncheck 5 and 6
Step 4: Count the remaining rows
- Click the fx button next to the formula bar
- You now get a new step with the following formula in the formula bar:

- Modify this formula using the Table.RowCount function:

Step 5: If the EndDate is more recent than the StartDate
In case the EndDate is before the StartDate the function should return a negative number.
- Modify the formula once more by adding an if statement:

Step 6: Convert the query into a function
- Go to Home → Query → Advanced Editor
- Place your cursor right in front of the let statement
- Type the following: (StartDate as date, EndDate as date) as number =>
- Press Enter
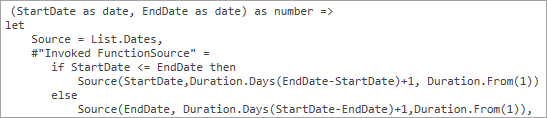
Your code should now start like this
Step 7: Use the variables inside the function
At this point, we’ve already converted our query into a function. Because we haven’t subbed the variables for StartDate and EndDate into the code, however, the function always returns the same value (6). Let’s change that!
As you might remember from the invocation of the function, List.Dates needs three parameters: the start date, the number of days and the step. Therefore, we have to calculate the number of days by subtracting StartDate from EndDate. If the EndDate is before the StartDate, we have to subtract EndDate from StartDate. Since List.Dates needs a duration as a second argument, we use Duration.Days to extract the day component from the difference between EndDate and StartDate:
- Taking this all into account, replace the step #”Invoked FunctionSource” with the following:
#"Invoked FunctionSource" =
if StartDate <= EndDate then
Source(StartDate,
 Duration.Days(EndDate-StartDate)+1,
   Duration.From(1))
else
   Source(EndDate,
      Duration.Days(StartDate-EndDate)+1,
      Duration.From(1)),
This is how the first few lines of your code look like now:
- Click Done
- Rename the query fnNetworkdays
- Click File → Close & Load
Using the function
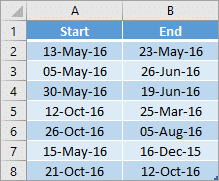
Now it’s time to call the function from another query. Here is an Excel table with 2 columns and a single row:
- Select any cell in the table
- Create a new query → From Table
- Right-click the Start column → Change Type → Date
- Right-click the End column → Change Type → Date
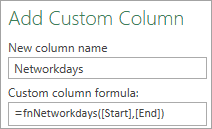
- Add Column → Add Custom Column
- In the Add Custom Column dialog, enter the column name and formula:

- Click OK
With that done, you can finally load the query:
- Home → Close & Load To…
- Select New worksheet
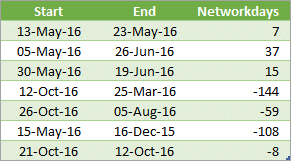
Here is the resulting table: